Pages

October 27, 2016

How to Give Your Dining Room A Farmhouse Style ~ with what you Already Have


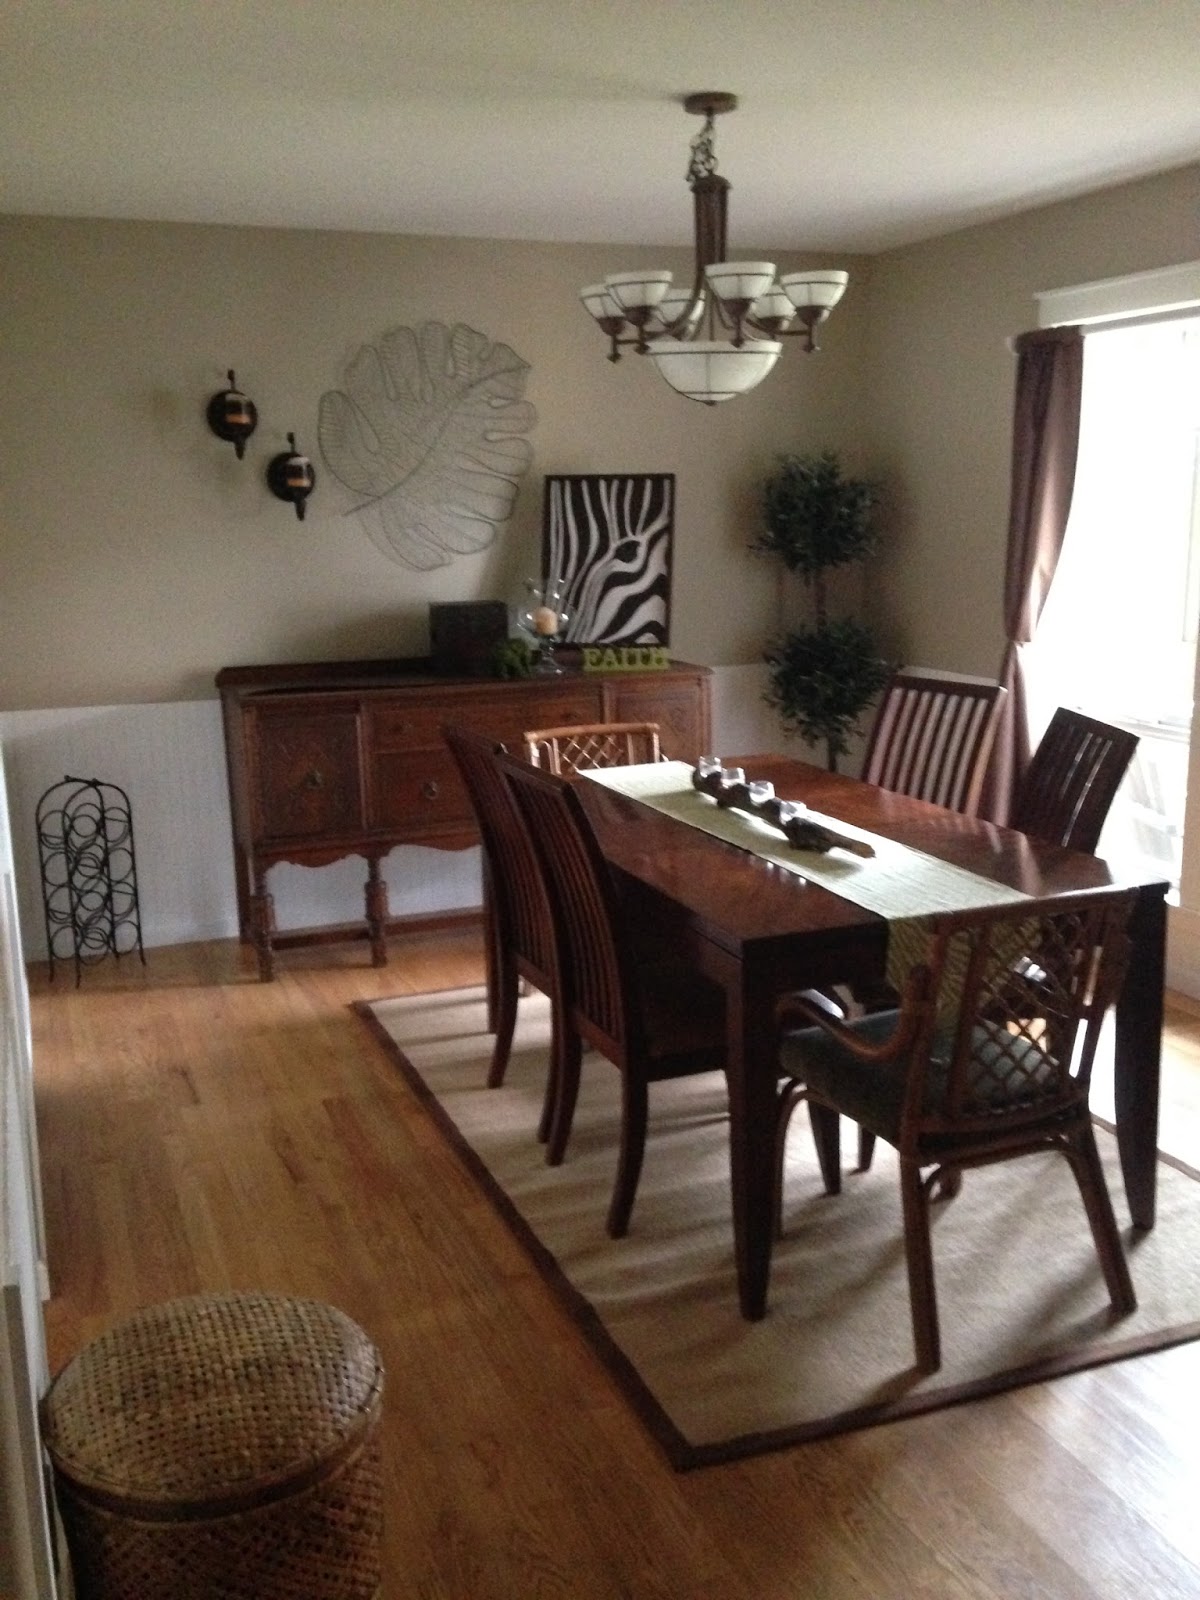
So here she is today in all her glory!  Well, maybe not glory.  But to me, it sure feels like it after what we started with.  It's been a long process to get it where it is today.  I don't have the budget to buy things all new.  But more importantly, I love things that are unique or have sentimental value.  Our home is supposed to reflect our family and who we are.  That means something different to everyone, but to me...it means family.

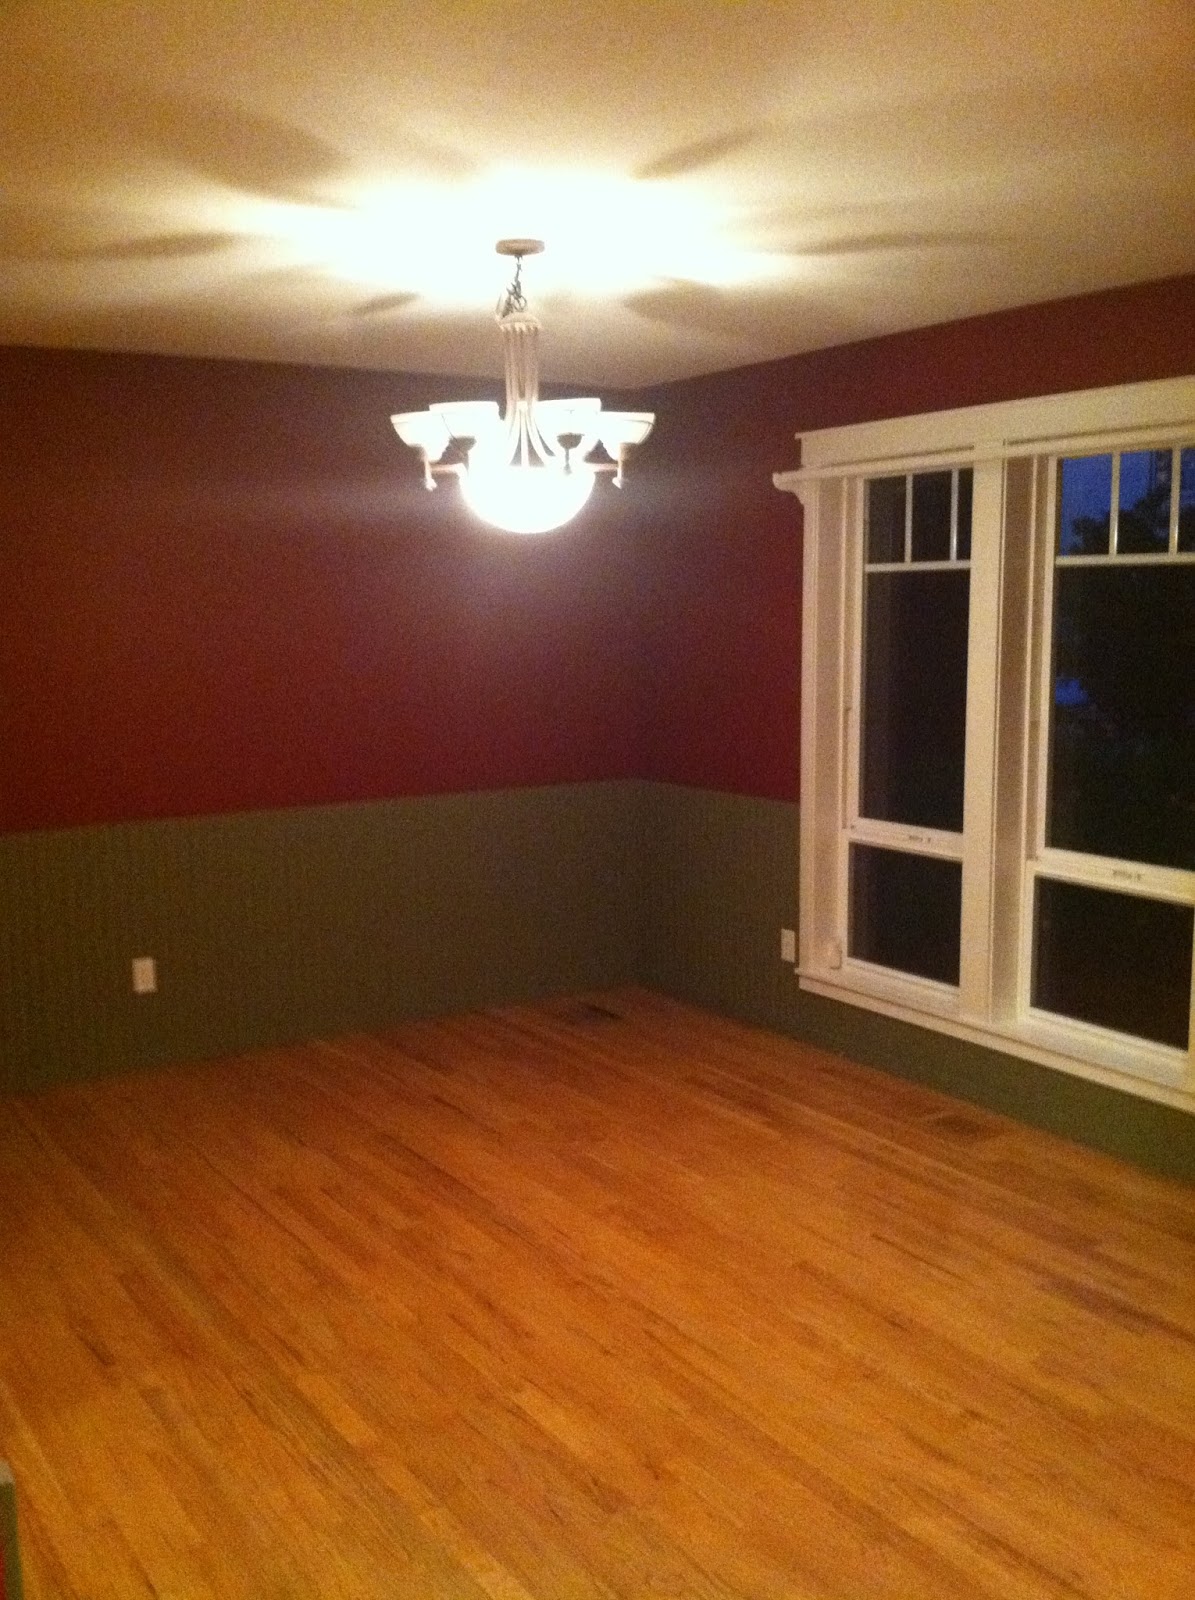
Let's go back to our before photo from the night we put an offer on the house.


You are looking at a room with red wall paint and a green painted beadboard wainscoting installed around the room.  The wainscoting is missing the finishing 'cap' or trim at the top of it.  It's just a raw edge of the beadboard you can buy at your local home improvement store.  

So, naturally...we started with paint.

 This was a great improvement in and of itself.  I picked this color for the whole interior of the house to just give it a blank slate as we were moving in.  It's called Pavillion Beige by Sherwin Williams.  

Here is a link to my Pinterest page where I first saw and saved it many moons ago, as I was dreaming of the day we would buy this home. 


I'd like to tell you that the rest of it just magically came together, but it took some time.  Most of our furniture was dark and we didn't have alot to fill up the room either.


Wow...just looking at this photo is crazy to me!  I can't believe how much it has changed!!!  You know how you don't notice something when it gradually changes daily over time?

The next thing I did was paint the buffet.  I used a chalk paint and lightly distressed it.  I didn't take any photos of this in process.  Well, you can see some in the background of this next photo.  We also sold our dark dining room table.  I had bought a table from a friend years before that needed some refinishing.  This was the perfect room for it.


And here is the before and after shots of the table we refinished!  You can find the full tutorial by clicking the link below.


Here is a quick before and after so you get the idea.


Next on my list was the 'cap' or trim for the top of the wainscoting that was never installed by the previous owners.  We decided to go with something as close as we could get to the trim around the doors in the house.

This was one of those projects we had the matrials sitting in the garage for what seemed like forever and not enough time.  So one day, I decided to do it while my hubby was at work and surprise him!  I think it turned out pretty good :).   He wasn't surprised though, I'm not sure anything could surprise him anymore.


I just painted the trim to match the wainscoating after it was installed.

Another thing that bothered me in this room was the chandelier.  It just felt so dated.  I love that farm house family look so much and a new light just wasn't in the budget.  So....we turned OURS into a more classic style you find in many stores today....but for FREE!  Just a few alterations and some good ole' Rustoleium Spray Paint.  You can check out what I like to use on metal in the link below.


And after changing out a rug here and there, making some curtains, adding some inexpensive candles and garage sale finds like crates and barrels...oh and fresh greens from outside every chance I can get.....

We have a COMPLETELY different look!

Remember the BEFORE shots?


Here she is today!  Do people name dining rooms like they do cars??  What should I name her?


The large barn door looking thing on the left is a sliding barn door in the progress of being hung.  All the details on that baby coming soon!


This room to me, reflects our family.  The buffet was given to me by my mom.  It was given to her by my dad once upon a time on HIS birthday of all things.  It took me a long time to get up the nerve to paint it, and I even asked my mom for permission...but this way we get to truly enjoy it many more years.  This table design is a big square that seats everyone facing each other equally...as a family.  There is a handmade sign that my oldest daughter made me in a corner that says "With God All Things Are Possible".  Also, the cross was given to me by my husband on mothers day, and reminds us we are saved by his Amazing Grace.  This room, is where our family and friends now make memories.  It's where I get to start and end my days with some of the people who matter most.

Thank you for sharing my journey with me.  I know it seems like alot, and if it overwhelms you...you are not alone.  Take it one step at a time.  One thing at a time.  Just like how I wrote about this makeover.  First, we painted.  Next, we did the buffet...and so on.  You CAN do it.  You CAN create a room that inspires you to be the best that you can be.  A room you get to start and end YOUR day in.  A room you can make many more years of memories in.

October 24, 2016

Mama's Banana Bread


One of the first things my mama taught me how to make as a little girl was banana bread.  To this day it's one of my favorites and a true comfort food in this household.  For some reason, I don't make it much until Fall comes around.  And then I don't make it past spring.  It's not intentional at all.  I don't tend to be one of those people who stick with seasonal foods.  For example, we BBQ on the grill here year round... and this is Oregon.  But there are definitely certain foods that don't taste the same to me unless you have them during the right time of the year.  And well, fall happens to be my most favorite season of all.

I do believe in cooking with the cleanest most organic foods that we can.  I try to buy organic local foods whenever possible.  Also, the least amount processed that I can if not at all.  But there are some things that making yourself (such as flour?), are just not realistic in this household.

I usually make banana bread when the bananas are starting to brown.  Nobody here will eat them, but they are not yet rotten.  The sweetness is at it's prime and they really 'make' the flavor in the banana bread.

So it all starts with a recipe.  Here's where I keep the ones that are paper clippings.  Just a binder with some paper in the front sleeve.  I'm pretty much in love with chalkboard 'anything' so this was no exception.


Farm Fresh organic eggs...


I've been playing with my new camera quite a bit and I am working on some photography and editing skills.  I think I'm getting better!  I bought the Nikon 3100 DSLR camera for blogging.  Here's a link below to check it out.

NIKON D3100 - Amazon Link CLICK HERE!


Back to the bananas...
This recipe isn't anything out of the ordinary.  It may actually be from a Betty Crocker Cookbook or something very similar.  When I moved out on my own, I called my mom for a recipe and this is what I wrote down.  I've just always used this recipe since then.


I always use a potato masher to mash my bananas.  To be honest, I'm not sure if other people do that or not??


They sure look beautiful coming out of the oven.  I made two loaves so they are kind of small and didn't rise to the top.  It just makes it easy to have one for my family, and one to give away.   There is usually someone who comes to mind who could use a pick me up.  Maybe a friend or family member having a hard time or some medical issues.  Sometimes I just give it to a neighbor to say hello.  
On this particular day, we welcomed some new neighbors to the neighborhood with one of these loaves.


Preheat the oven to 350 degrees.

INGREDIENTS:
1 1/2 cups of flour (I use all purpose unbleached)
1 1/2 teaspoons baking powder
1/4 teaspoon baking soda
1/2 teaspoon cinnamon
1 teaspoon vanilla
1 egg
3-4 ripe mashed bananas
1/2 cup of sugar
1/4 cooking oil (I use coconut oil - melted)
Lemon peel finely shredded (I use all of one small lemon)

INSTRUCTIONS:
1. Grease the bottom and sides of a loaf pan. 8x4x2 
2. Combine all wet ingredients, plus sugar in one medium sized bowl. (Vanilla, egg, bananas, sugar, oil, lemon zest)
3.  Combine all dry ingredients in a second medium sized bowl. (flour, baking powder, baking soda, cinnamon)
4.  Add wet ingredients to dry ingredients and mix until well blended.  The batter will be lumpy.
5.  Add all your batter to your loaf pan and bake for 50 minutes. (or until toothpick comes out clean when inserted)

I usually let it cool about 15 minutes before slicing and serve as is.  OR, you can add cream cheese or butter to it.  Even better, add that while it's warm its to die for.  

I usually try to be good and enjoy just the one slice without anything added if I'm going to splurge.


My kids can usually smell it the minute they walk in the door from school.

Do you have any special banana bread recipes that you have used for years?  Or even another bread recipe?  I love zucchini bread and pumpkin breads too....mmmmmm.

October 20, 2016

How to Lighten up Your Family Room


Welcome to our family room!  This room has been an ongoing process over time.  I have slowly but surely changed the entire look of this room to reflect my love of vintage farmhouse living.  And I've been able to do it with mostly things that I already had... along with some DIY elbow grease.

Let me take you along on my journey.  Let's start with the before photos I have of the night we put an offer on the house.

 I do apologize as the photos are not great.  But you can see that the wall colors are a dark brown, the fireplace has green woodwork and a slate type surround.  It just felt so dark to me.  The first thing we wanted to do was lighten it up.  And that starts with paint.  We used a Sherwin Williams paint called Pavillion Beige.  You can find a link to this on my Pinterest page below.

Sherwin Williams - Pavillion Beige - CLICK HERE!


When we moved in, I had a lot of dark heavy furniture.  I liked the look once upon a time...but realized one day I was creating a look that wasn't me.  I was decorating my home the way I thought it was supposed to look, as opposed to what I loved.

My best girlfriend had come into town several years back for a visit.  She is a floral designer and blesses me with these huge bouquets of flowers and decor goodies whenever she comes.  On this particular visit, she brought a HUGE boquet of my FAVORITE flower ever, the daisy.  I have loved them since I was a little girl. They were even our wedding flowers!  The problem was that they didn't go in my home anymore!?!??  They are light and fun and wild, while my house was dark and rich full of deep golds, greens and reds.  I still remember she made the comment, "I never thought I'd see a day where daisies didn't go with the decor in your house".  I've never told her this, but it stuck with me, and I started reevaluating the look of my home.

Just for fun, here's a photo of my best friend Bekkah and I!  I hope this doesn't get me in trouble with her, but this is one incredible lady I am blessed to have in my life!  She has been my best friend for 24 years and we have been through so much together.  I love this woman to no end!

You should TOTALLY check out her floral design business if you you live in the Pacific NW. She does weddings, events, holidays and just everyday bouquets.

Check her out here!
THE GARDEN'S TALE - ON Facebook!  CLICK HERE!
or
THE GARDEN'S TALE - ON Instagram!  CLICK HERE!
  

Okay, back to the house.  So when we moved in I still had a lot of the darker furniture and was working on lightening things up over time.  Here's a little time travel.


In this next shot you can see I recovered the chairs on the right to a lighter chevron and got a lighter sofa on the cheap.  This is the same sofa we still have.

You see in these next few shots that I started playing with pillows, taking out color and adding new color.  I made the clock on the wall which is coming to a new blog post near you.  Stay tuned for that! I rearranged a few things, painted some things and added a new rug.


You will notice on the fireplace photo below that we redid the rock surround!  You can find that tutorial on my blog post by clicking below!


More playing with color and accessories.  


After changing out candles and adding lighter and brighter accessories in the house it made a HUGE difference.  Then, I realized that it was the coffee table.  It was such a HEAVY piece that it needed to be lightened up.  Now I'll tell you, I found this coffee table FREE on the side of the road 8 years ago...that was a beautiful day for me! I would have carried that thing home on my back if I had to.  I still ABSOLUTELY love it and will probably never get rid of it.  It's a super solid piece of furniture that can be updated and changed over time too.  Very timeless.

But look what a little paint did for my family room on that coffee table!  A few other tweeks and I have the look I have today.  Overall I didn't spend a lot of money on it.  I make most of my pillows and curtains and refinish the furniture I can.  I think I may have spent $350 in this room overall including the new sofa, fabrics, rugs, supplies and paints. 

You will notice I also redid the same chair again.  I just recovered the fabric and painted the wood white this time to brighten it up.  I will have a blog post coming soon on this too so stay tuned.

Remember the Before?


And now the AFTER!


I just took these shots with my new camera this morning.  There is definitely a learning curve but I love the difference a good camera can make!  I'm using the Nikon D3100 which is a DSLR camera.  I think it has all the features for someone like me. I wanted a camera to take shots of my family and for blogging but without being the complicated over the top camera that many professional photographers use.  Here's a link to Amazon to check out this camera and all of it's features if you are interested.


Think in terms of textures and layers.  A good mix of metals, woods, wickers, fabrics, patterns, and fresh greens or flowers. If something isn't the color you like it, most often you can change it with paint, stain or fabric.

This is all still a process for me and I have big plans to add to this room in the future, so follow along on my adventure!

The BEST part for me?  I think it truly reflects my personality, and a bouquet of daisies would fit right in and enhance the space.  My space inspires me to be the best me that I can be.

I'd love to see your progress in your home too!  Please feel free to follow along on my facebook page and you can share with me there too.  Thank you so much for stopping by my blog today!

Blog Archive